
Whether you are an ecommerce seller needing clean product shots, a photographer processing client images, or a designer building creative composites — knowing how to remove a background in Photoshop is one of the most valuable skills you can have. In this guide, we break down all 7 methods available in Photoshop, explain exactly when to use each one, and tell you which technique delivers the cleanest results for different image types.
In this guide
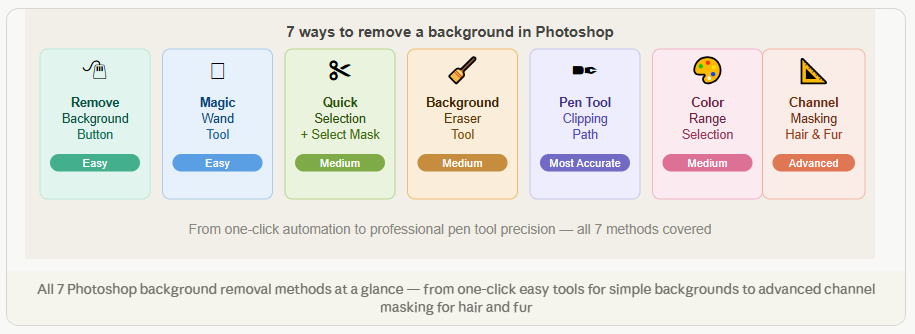
- Method 1 — Remove Background button (one click)
- Method 2 — Magic Wand Tool
- Method 3 — Quick Selection + Select & Mask
- Method 4 — Background Eraser Tool
- Method 5 — Pen Tool (clipping path) — most accurate
- Method 6 — Color Range selection
- Method 7 — Channels masking — best for hair & fur
- Comparison table — which method should you use?
Before you start — 3 things to know
Before choosing a method, three factors determine which technique will give you the best result: the complexity of the subject’s edges, the contrast between the subject and the background, and the final use of the image (web, print, or composite).
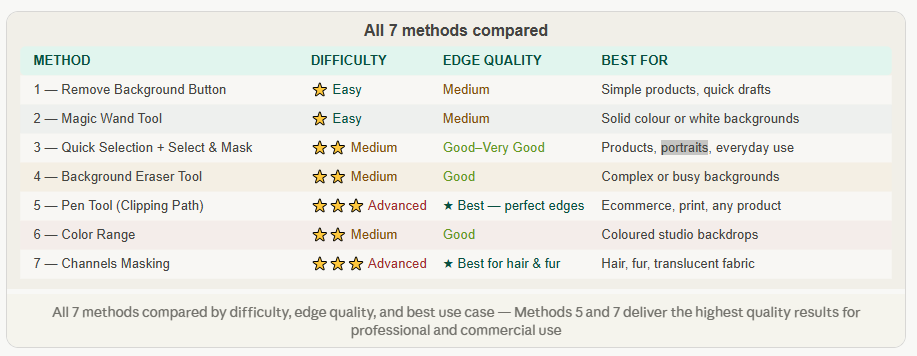
- Simple, hard edges (products, boxes, shoes) — Methods 1, 2, 3, or 5 work well
- Soft or wispy edges (hair, fur, fabric) — Methods 7 or 3 with Refine Edge are needed
- Solid or uniform backgrounds (white studio, plain colour) — Methods 2 or 6 are fastest
- Complex or busy backgrounds — Methods 4, 5, or 7 give the most control
- Print-ready work — Only Method 5 (Pen Tool) delivers a true vector-quality edge
1. Remove Background Button — One Click Automatic
The Remove Background button is Photoshop’s AI-powered one-click background remover. It was introduced in Photoshop CC 2021 and uses Adobe Sensei AI to automatically detect the subject and remove the background — all in a single click with no manual work required.
It works best on images with clear contrast between the subject and background — a product on a plain white studio backdrop, for example. On complex backgrounds or subjects with soft edges like hair, the results are inconsistent and usually require manual touch-up.
How to use it
- 1 Open your image in Photoshop and select the layer in the Layers panel.
- 2 Go to the Properties panel (Window → Properties) — make sure your layer is selected.
- 3 Click “Remove Background” in the Quick Actions section at the bottom of the Properties panel.
- 4 Photoshop will automatically detect the subject and apply a layer mask. The background disappears.
- 5 If needed, paint on the layer mask with a black brush to hide areas or white brush to reveal them.
When to use
Use the Remove Background button for quick drafts, simple products on plain backgrounds, or when speed is more important than edge precision. For print-ready or high-quality ecommerce images, always follow up with manual refinement or use the Pen Tool instead.
2. Magic Wand Tool — Click to Select by Color
The Magic Wand Tool selects areas of similar color with a single click. If your image has a plain white, grey, or solid color background, the Magic Wand can select and delete the entire background in seconds. It is one of the oldest tools in Photoshop and still one of the fastest for simple background removal.
How to use it
- 1 Select the Magic Wand Tool (W) from the toolbar. Set Tolerance to 20–30 for a balanced selection.
- 2 Click on the background area. Photoshop selects all pixels within the tolerance range of that color.
- 3 Hold Shift and click any remaining unselected background areas to add them to the selection.
- 4 Go to Select → Inverse (Shift+Ctrl+I) to select the subject instead of the background.
- 5 Click the Add Layer Mask button in the Layers panel to apply the cutout non-destructively.
Tolerance setting explained
Tolerance controls how similar a color must be to the clicked pixel to be included in the selection. Low tolerance (0–15) selects only very similar colors — good for pure white backgrounds. Higher tolerance (30–60) selects a broader range — useful for slightly uneven backgrounds. If your selection bleeds into the subject, lower the tolerance and try again.
3 Quick Selection Tool + Select & Mask — Smart Semi-Automatic
The Quick Selection Tool lets you paint a selection by dragging over the subject. Photoshop automatically detects and follows edges as you brush. Combined with the Select & Mask workspace — which includes the powerful Refine Edge Brush — this is the most versatile method for everyday product photography and portrait work.
How to use it
- 1 Select the Quick Selection Tool (W) and paint over the subject. Photoshop auto-detects the edges.
- 2 Hold Alt/Option and paint to deselect any areas accidentally included in the selection.
- 3 Click Select & Mask in the options bar to open the refinement workspace.
- 4 Use the Refine Edge Brush to paint over hair, fur, or complex edges — Photoshop detects fine strands automatically.
- 5 Set Output to New Layer with Layer Mask and click OK. Your cutout is applied non-destructively.
4 Background Eraser Tool — Manual Edge Painting
The Background Eraser Tool samples the color at the center of the brush cursor and erases pixels of that color — allowing you to manually paint along edges to remove the background while preserving the subject. It is a destructive tool (permanently erases pixels), so always work on a duplicate layer.
How to use it
- 1 Duplicate your layer first (Ctrl+J) — the Background Eraser permanently deletes pixels.
- 2 Select the Background Eraser Tool (hidden under the regular Eraser in the toolbar).
- 3 Set Sampling to Continuous, Limits to Find Edges, and Tolerance to 20–40%.
- 4 Paint slowly along the edges of the subject. The crosshair samples the background color — keep it off the subject at all times.
- 5 Use the regular Eraser for larger flat background areas away from the edges to save time.
Important warning
Always duplicate your layer before using the Background Eraser. Because it permanently deletes pixels, any mistake on the original layer cannot be undone once the file is saved. Work on a copy every time — it takes two seconds and saves you from a potentially irreversible error.
5 Pen Tool (Clipping Path) — Most Accurate Method
The Pen Tool is the gold standard of Photoshop background removal. By drawing a precise vector path around the subject anchor point by anchor point, you create a mathematically perfect edge that holds up at any zoom level, any resolution, and on any background color. It takes longer than other methods but produces results that no other technique can match.
This is the technique used by professional image editing studios — including Graphics Anywhere — for every product image that will be used in ecommerce, print advertising, or high-resolution display contexts.
How to use it
- 1 Select the Pen Tool (P). Set it to Path mode in the options bar (not Shape).
- 2 Zoom in to 100% or more. Click around the edge of the subject to place anchor points, creating a closed path.
- 3 For curved edges, click and drag to create Bézier curve handles — adjust the handles to follow the subject’s contour smoothly.
- 4 Once the path is closed, right-click the path in the Paths panel and select Make Selection. Set Feather to 0.
- 5 Go to Select → Inverse then press Delete — or add a Layer Mask for non-destructive editing.
- 6 Save the path in the Paths panel — name it “Clipping Path” and set it as the clipping path in Save as EPS or TIFF for print use.
Professional tip
Place anchor points sparingly — fewer anchor points create smoother curves. On a gently curving edge, one anchor point every 2–3cm at 100% zoom is plenty. Only add more points at sharp corners or sudden direction changes. Fewer points = smoother path = cleaner edge.
6 Color Range Selection — Target by Color Across the Image
Color Range is a selection tool found under the Select menu that lets you select pixels across the entire image based on color or tonal range. Unlike the Magic Wand which works from a single click point, Color Range analyses the whole image and selects every pixel that matches your sampled color — making it far more thorough for backgrounds with slight tonal variation.
How to use it
- 1 Go to Select → Color Range in the top menu bar.
- 2 The Color Range dialog opens. Click on the background color in the image preview or the main canvas.
- 3 Adjust the Fuzziness slider — higher values include more color variation. Watch the preview: white = selected, black = not selected.
- 4 Hold Shift and click additional background shades to add them to the selection. Click OK when satisfied.
- 5 Refine the selection edges using Select & Mask, then apply as a Layer Mask.
7 Channels Masking — Best for Hair, Fur & Fine Detail
Channel masking uses Photoshop’s individual color channels — Red, Green, and Blue — to create a high-contrast mask based on the natural tonal difference between the subject and background. This technique preserves fine hair, fur, and translucent fabric detail that every other method destroys. It is the professional standard for fashion photography and portrait editing.
How to use it
- 1 Open the Channels panel (Window → Channels). Click through Red, Green, and Blue channels to find the one with the highest contrast between subject and background.
- 2 Duplicate the highest-contrast channel by dragging it to the New Channel icon.
- 3 With the duplicate channel selected, go to Image → Adjustments → Levels. Drag the black and white sliders inward to maximise contrast — make the background as white as possible and the subject as black as possible.
- 4 Use a black brush to paint over any remaining grey areas inside the subject until the subject is completely solid black.
- 5 Ctrl+Click the channel thumbnail to load it as a selection. Go back to the RGB composite channel, then to the Layers panel.
- 6 Go to Select → Inverse and add a Layer Mask. Every strand of hair is preserved in the final cutout.
Why channels masking works so well for hair
Hair photographed on a contrasting background (light hair on dark, dark hair on light) creates natural tonal separation in the color channels. The channel masking technique exploits this separation to preserve edge detail at the sub-pixel level — something that no selection tool or AI background remover can replicate. This is why channel masking has been the industry standard for fashion retouching for over 20 years.
Which method should you use? — Quick decision guide
Here is the simplest way to decide which technique to use based on your specific situation:
- Quick rough cutout for internal use: Method 1 (Remove Background button)
- Product on plain white studio background: Methods 2 or 3
- Product on coloured or textured background: Methods 6 or 3
- Ecommerce listing requiring clean precise edges: Method 5 (Pen Tool)
- Fashion model or portrait with hair: Methods 7 or 3 with Refine Edge
- Pet photography or animal fur: Method 7 (Channels)
- Print-ready artwork for catalog or advertising: Method 5 only (Pen Tool clipping path)
Save time — outsource to a professional editing service
Learning these techniques takes time. Mastering the Pen Tool to a professional standard takes practice measured in weeks, not hours. For businesses processing hundreds or thousands of product images per month, the most cost-effective solution is not to do it yourself — it is to outsource to a specialist editing team.
At Graphics Anywhere, our editors use the correct technique for each image type automatically — Pen Tool for hard-edged products, channel masking for hair and fur, Quick Selection with Refine Edge for everyday product batches. Every image is quality-checked before delivery. Turnaround is 24 hours. And you can try us free with 2 images before committing to anything.
Too busy to edit backgrounds yourself? Let us do it for you.
Manual Photoshop editing — 24hr delivery — free 2-image trial. Visit graphicsanywhere.com